
LinkedIn is more popular than ever. Proper use of this social media can expand your professional network as well as promote your business. This article has the details as to why you should have a LinkedIn for yourself and your business, as well as tips to optimize your profile for maximum impact.Lau...
MailChimp Use and Importance
Digital Marketing | Intrada Webmaster | Wednesday, October 7, 2015
MailChimp is a popular web software used for sending email blasts. Included in this post are details about each tab of MailChimp and how to use them to send effective emails to your clients.
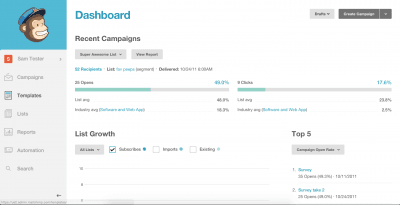
Dashboard
What do I see on my homepage?
Recently sent campaigns. This is a drop down list. You can change the lists to see past campaigns and the short reports provides. This short report shows the subscribers sent to, which lists, the subject of the blast and when it was delivered. The short report also provides the amount of opens and clicks each email campaign received.
A chart with list growth. There is an option to change the lists you see. The original chart that appears is automatically set to show all lists. This can be changed to see each one individually. Make sure to keep your lists updated.
Top 5 – this shows which of your campaigns has the most opens, clicks and clicked links. They are ranked 1-5 within each of the categories.
Chimp Chatter shows a timeline of your activity. If you add new subscribers or someone on your lists unsubscribes, the date and time appear in this feed.
How do I use these to my advantage?
The recently sent campaigns provides an overview that is quick to look at. It is right at the top of the page and you can easily see how many people opened your email and how many clicked within it. You are also able to compare your stats with you past campaigns sent from the same list and other emails sent by those within your industry.
Top five is the other important piece to this page. Everything is organized in order already. If MailChimp is utilized correctly, each campaign should get more opens than the last. You are able to look at each campaign and see if a certain send time or subject produces more opens. Each campaign should also produce more clicks. Make sure that there are links within your email and that they are interesting. The clicked links also show what people are clicking in your email – the links you may think are interesting may not be what is attracting attention. Tailor your emails to the interests of your audience.
Campaigns
What can I do on this page?
This page shows all of the campaigns you have. This includes sent, paused, scheduled and drafts of campaigns. If you are sending out multiple emails per month or you have been using MailChimp for a long time, creating folders is helpful. Create folders per month, quarter or year to better organize your campaigns and be able to analyze the data you’ve collected.
Export your campaigns as CSV. This will create an excel spreadsheet with all campaigns (or within each folder) for easy analyzing. Once in Excel, you are able to manipulate the data to show it in different ways depending on what your use of it.
On the right side, next to each “View Report” there is a drop down arrow. Through that you can socially share each email, rename, replicate or view it.
Templates
Should I have a template?
Yes! Not only is it easier for you, but each email will have a more standard appearance. Having a saved email design makes your campaigns cohesive and, if used correctly, simple to understand by yourself and your readers.
How do I create a template?
Go to the top right corner and choose “Create Template”. You will be taken to a starting page. You are welcome to choose a basic layout to edit yourself or one that is already themed. Preview a few themes or layouts and choose one by clicking “Select” next to it. After you choose your template, update it with your information!
I’ve chosen a basic template. What should I put on it?
Start by placing your company logo at the header. This will provide your readers with immediate recognition. Next design the text of your email. You are welcome to change the text styles. Below that are social media links. Be sure to update these if you are on the medium (professional accounts only). You are able to add and subtract these as necessary. Finally, be sure to update the footer information. Your contact information will automatically be added in the footer block.
How do I know what my template will look like?
In the top right there is a “Preview and Test” option. If you click that you can choose to be taken to a preview mode or send yourself a test email to see how it will show up in your inbox.
Lists
How do I create a list?
At the top right of this page is the button to “Create List”. Clicking the button will give you the option to create a list or breakdown an existing list into a smaller groups.
After choosing to create a new list, you will then add in list details. Give the list a descriptive name. Make sure that your “from” email is your professional email address and your “from” name is how the list members know you. Example: If you go by Jim Smith at home, but are professionally known as James, be sure to put James in this box. Next, put in the reminder of how your recipients signed up for the list. Fill in company information at the bottom to meet MailChimp’s Anti-Spam Requirements.
At the bottom, before saving, choose your notification settings. Depending on the size of your lists, a daily summary email will either be helpful or overwhelming. If your list is under 500, you may only want to choose “one-by-one” either subscribers or unsubscribers.
Reports
What can I see on each report?
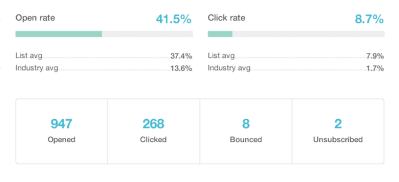
After clicking on each report to get the details, the overview shows up. At the top is the standard short report you see on the dashboard. Scrolling down will show successful deliveries and percentage, opens, potential forwards, clicks per open and total clicks.
A graph shows up with 24-hour performance. This provides you with information on how many opens took place during the first 24 hours from when the campaign was sent out. This can be used to find the best time of day to send out future emails.
The report also shows which links were the most popular (and total clicks on each) as well as which subscriber opened the email the most times. If there are social medias attached in the email, you will be able to view your social performance. A map at the bottom will also break down locations by opens. It will show states as the smallest breakdown.
What can I see under the Activity dropdown?
You can break down each campaign further by seeing sent to, opened, click, didn’t open, bounced, unsubscribed and complained lists.
Why are Activity lists helpful?
If you are looking for a particular person to know if they received or opened your email, they can be found within these lists. It is also helpful to find out the reason someone has unsubscribed from your email. If it is more than a few for each campaign sent, there may be a problem with the content you are sending out. Finding the bounced emails is also important. If you have other contact information for this person, use it to reach them and get an updated email address if they wish to receive campaigns.
Helpful Tips
- Use the Top 5 on your Dashboard
- Create folders to keep your campaigns organized
- Use a template
- Keep your lists updated
- View reports for the most details on each campaign

ABOUT THE AUTHOR
Intrada Technologies is a full-service web development and network management company with a focus on creating ongoing, trusted partnerships with each of our clients. Our seasoned professionals share key insights to transform and empower your digital journey.
Learn MoreNetwork Security and Audit Compliance Service...
Intrada’s sister company, PRWorks, is available to work with clients in the event of a data security breach. This could include media management, press releases, strategic planning and remediation of breach.Network Security is critical to successful business growth. With the growing security threats...